Showing posts with label Kids Crafts. Show all posts

Wednesday, June 13, 2012

Kool-Aid Playdoh


Today we crossed another thing off our Summer Fun List 

* Koolaid Playdoh *

For this you'll need the following: 

Two packets of KoolAid any flavor
1 1/3 cups flour
1/4 cup salt
1/2 teaspoon cream of tartar 
1 cup boiling water
1 1/2 tbsp Oil 

Start off by putting a pot of water to boil. 

Than get enough bowls for each KoolAid flavor/ color. 
Stir together all the dry ingredients 
(Both packets of KoolAid, Flour, Salt, & Cream of Tarter)

Add the boiling water and oil  to the dry ingredients and 
watch the color and scent Pop !! 

Watch the little ones with the hot water!!!

Once all the ingredients are mixed together and its cool enough to touch, empty it onto the counter and knead away, mixing in flour as you go, 
until the Play doh is no longer sticky 

(This is how it looks all mixed together, before kneading)

And here it's all kneaded together. 

(Caution this can get very messy with little ones )

 I was able to knead three of the play-doh's while the boys worked on their dough.
Its tough having little hands to work with !!
Our favorite turned out to be the Grape (Purple) and Cherry (Red). 
They turned out to have the most color and smelled Yummy !!! 


After the play doh was all set it was Cookie Cutter time.


Thursday, September 15, 2011

Art Project Display

Do you have a way to display your child art and school projects ? ?
Do you just put them on the fridge ? ?
Or just stick them in a drawer ? ?

We used to just put them on the fridge but after we got a new Stainless Steel Fridge we lost the ability to put them up there .. but to be honest I never really liked them up there, it always looked really cluttered and sometimes they would get wet, from little boys shaking the water off their hands instead of using the towel  4 inches way. So after our old fridge was hauled off I had to come up with a new way/ place to display all their projects. After blog hopping and website 'shopping' I came across a blog (forget the name now)  where the lady glued metal clips to a wire. And although hers turned out awesome I didn't really want to use metal clips, fearing they might rip one of the art pieces if they were even slightly tugged on and I had to metal clips anyway but I did have clothes pins handy. I also didn't have any wire but did have an 8ft long piece of wood, so after a quick cut in half I was on my way to a Masterpiece Display.

I made the ones for my boys months ago but recently my sister-in-law and a good friend had asked me to recreate ones for their little ones.

I started off by clipping the clothes pins on a box so they would be easier to paint.

After cutting the 8ft piece into two pieces,
I sprayed painted each one and once dry I whipped out the trusty tape measure and went to work measuring out equal spacing.  

Next use either a glue gun (my choice)
 or a strong glue to attach the clothes pins to the wood.

Next you can either free write your child's name, use vinyl to place their name on or go to Joanns, pick up a wooden letter, paint and attach like I did. (I need to go back and get the other two letters)


Here's a picture of ours in 'use'.

Friday, September 2, 2011

Sunny Arizona Days

This pass week, here in Tucson we were over 105 all week, which makes it miserable to be outside for longer than its takes to get from the a/c in the car to the a/c in the house.
So to keep from going stir crazy we did tons of crafts this week. 

We started with making a cute clothespin sun
 in honor of the sunny Arizona. 
 
Start off with just a plain paper plate.
And cut in half, or as close to half as you can get.
Than have the little ones paint each half yellow,
on the 'outside' of the plate.
(Side note: I love that when I bring out this tablecloth, the boys automatically know that we're going to be painting)
While the boys were painting, I cut up some ribbon in different lengths.
After the plates were dry (which took all of 5 minutes, in this heat)
We used tape to attach the ribbon to the plate.
On the other yellow half of the plate,
 glue on two googly eyes and a smile.
I had already had some clothespin painted orange and yellow. I gave each one four or each color. So eight clothespins total.
Use a glue stick to attach your two paper plates halves together, and clip the clothes pins on the top (for the rays.)
And if you'd like while your drawing on your smile, you can add an unibrow :) like Kasen did.
  I said it before and I'll say it again, I love easy peasy crafts.
Perfect for after school !

Thursday, June 9, 2011

Caterpillars * Recyclable Craft

I love recyclable crafts.

And even more I love the look on their faces when I set something like an egg Carton in front of them and tell them we're making Caterpillars. Have to love the "Huh ? ?" look. Super easy craft, take the bottom of an egg carton, cut in half and hand a half to each kiddo.
Than let them paint away . . .
They can take the Kasen route and mix all the colors !
Or the Taelor route and make a pretty rainbow
After they were done painting, I put them outside to dry, didn't take long here with the Tucson heat today.
After they're dry attach two googly eyes to the front. Next, for the antennas I simply cut a pipe clean in half, twisted around a pen and poked through the top of the egg carton. Easy Peasy .
We're in bug heaven over here ever since I got the boys bug catchers from the Dollar Store and these were perfect to feed into their Bug Lovin' .

Monday, April 4, 2011

Stained Glass Butterflies

I'm back sorry for the absence, its been a very LONG few days. . one of the little men was sick and finally diagnosed with strep throat, than my mom was in a car accident,

So needless to say its been hectic around her lately.

Things are finally settling down so back to Blogland I come !

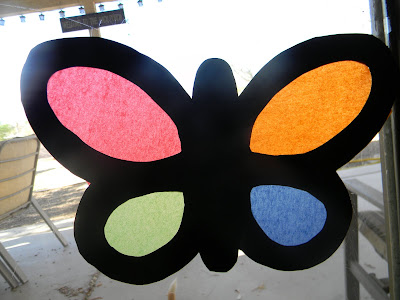
Spring has finally hit, so bring on the butterfly crafts !This adorable craft is super easy for the kiddos, minimal work for the mamas and requires very little supplies. . . black construction paper, different colored tissue paper and a glue sticks. Simple enough right ? ?

I found a butterfly template online, printed it out and traced that onto four pieces of paper, than I shrunk it and traced the smaller one onto another four pieces of paper.

Last night while the little ones were sleeping I cut out the butterflies and 16 pieces of tissue paper. First off have your little one put glue all along the butterfly outline. and proceed to put four pieces of tissue paper on. . at this point don't worry about the tissue paper hanging off the edges,

just make sure its stuck on there good. After they were done putting their tissue paper on, I cut off all the excess paper hanging off the edge. Don't worry about it not looking pretty.Next take the other butterfly you cut out and lay that over the side of the butterfly you just trimmed the tissue paper off of. If you need to trim off an other little pieces. Finally, display proudly and beautifully in your window. Love it ! ! Happy Crafting !

Sunday, March 27, 2011

Finger Painting Rainbows

What kid doesn't love finger painting ?

Putting your fingers in ooey, gooey mushy paint = Fun

Kasen's Masterpiece

Taelor's Rainbow
Related Posts Plugin for WordPress, Blogger...